
Transcription is a common and tedious task in Digital Humanities research. This usually means the researchers need to spend countless hours deciphering (sometimes very tricky) handwritten documents and converting them to a digital format to be processed by other tools. But what if this process could be done by the computer itself instead?
Enter OCR, or Optical Character Recognition. Basically, it’s using a computer program to turn images of written characters into digital text. While this process can be orders of magnitude faster than by-hand transcription and is getting more reliable as the techniques become more advanced, it usually isn’t as accurate. But let’s give it a try!
1. Getting Started
In this tutorial, we will be using the pytesseract library for Python. If you’re not familiar with programming in Python, you can download it here and you can find some basic tutorials here. However, you won’t need more than a basic understanding of programming in Python to follow this tutorial. Note that you should install python3 for this tutorial, as that is what I will be using.
Once you have Python installed, you’re going to need to install the pytesseract library along with the pillow library. (You can find a tutorial on installing Python packages with pip here).
2. Basic Code
Now that we have everything installed, let’s create our simple OCR Python program. Open up your text editor of choice (mine is VSCode, but you can also use something like the built-in TextEdit on Macs) and type in the following code.

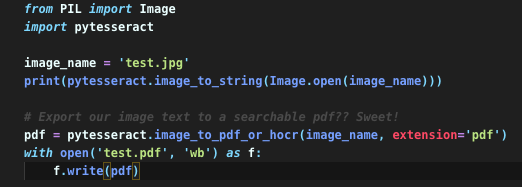
Here we are using the image_to_string function from pytesseract to “transcribe” the characters in the image file ‘test.jpg.’ But wait, what is ‘test.jpg?’
3. Find An Image
Well, let’s find some images to test. Starting out simple, let’s try this image of plain text. You can right click on it to download it yourself and rename it to ‘test.jpg’ in the same folder as you made your python program.

4. Test Our Program
Now to execute our Python program, open up your terminal to the directory where you’ve saved the program and the image. (Here is a tutorial on navigating a mac terminal). Then type python3 test.py, where ‘test.py’ is whatever you have named your program. You should see some output like this:

Look at that! Our program was able to recognize the letters in the image and printed them out. That’s pretty neat.
You can play around with more ‘difficult’ images to read than this plain text image, such as handwritten text, but I’ve found the results of reading hand-written text to be pretty disappointing using just the basic pytesseract library. More advanced techniques involving machine learning do exist out there, but they’re outside of the scope of this tutorial!
5. Even Move Useful Features!
In practice for DH projects, just printing the OCR output to the terminal isn’t going to be of much help to us. However, another awesome feature offered by the pytesseract library is the ability to export the results of our OCR to a searchable PDF file. Now that seems pretty useful! To do this, we will add the following code to our Python program
After running the program again, you should see a new file in the same folder called ‘test.pdf’ with the results of our OCR. If we open this file in preview (or whatever you use to view PDFs) and perform a search, we can see that it worked.
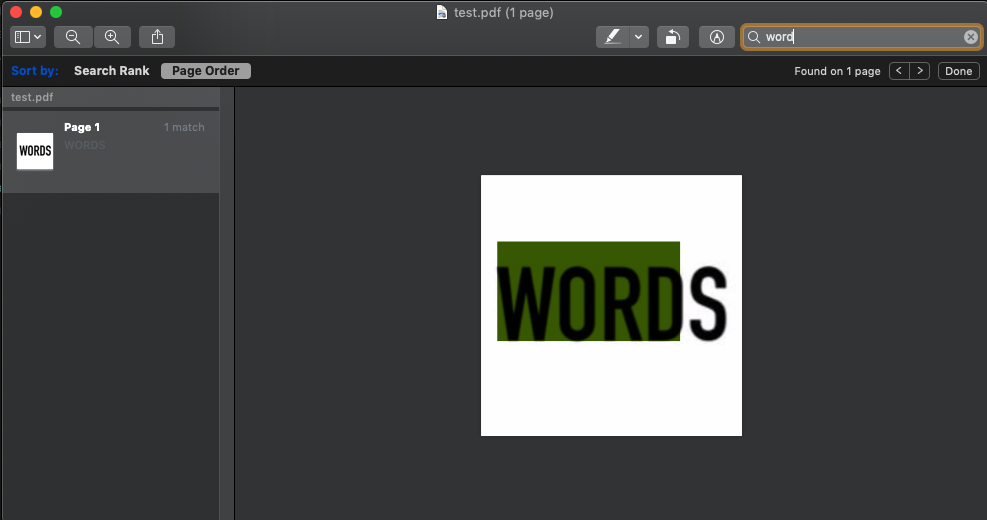
I can search for text within the resulting PDF file. Cool!
Resources
Download Python – https://www.python.org/downloads/
Python Tutorial – https://www.w3schools.com/python/
Tesseract Documentation – https://pypi.org/project/pytesseract/
More Advanced OCR –
https://towardsdatascience.com/a-gentle-introduction-to-ocr-ee1469a201aa
