
One of my teachers in junior high was absolutely enchanted with code and spend the year trying to teach us as much as she could. Eventually, we all became fairly proficient in both HTML and CSS. I vaguely remember it being fun at the time, but because it was five years ago, I don’t actually remember how it works. Having to go back to the fundamentals to get a refresher on my sadly dormant skills was frustrating. I feel both like I understand it well enough to move on, but not well enough to attempt any of the more advanced code. It’s especially intimidating when there’s more code, but you’re still having difficulty placing everything in the right order! My goal by the end of the tutorials was to feel confident enough to understand where a more advanced code is coming from.
There were definitely some problems I was unable to resolve. For example, some of the images I tried to attach ended up sideways, even though the appeared correct in my files. Additionally, when I was going through tutorials they forgot to mention the fact that you need to have the photo in the same folder as your other files. I only found this out after some trial and error. The last main problem I had was the fact that at the bottom of my page, it renders as if there is another (blank) paragraph, although there isn’t any code there to signify that. It’s possible something in the images in the prior paragraph section confused it.
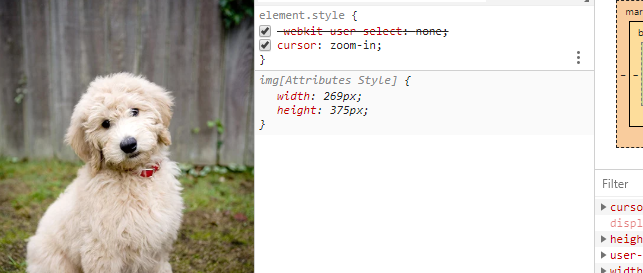
But, never fear, in addition to these setbacks I had a lot of success! I felt like one of the things I learned that I didn’t expect to was the use and importance of borders. I still don’t understand them completely, but even just a little modification of the borders added a lot of quality. I wish I had the time to experiment with it more. Additionally, I found out a method to determine width and height of photos that come from the browser, to allow for less guesswork in the data. While I don’t know where to start with downloaded photos, the process for internet images is below:
- Find an image on the web
- Right click and select “open in new tab,” to better isolate the photo.
- Right click “inspect” and it should pull up what width and height are being used! From there it should be easy to approximate or do simple math to make the picture bigger or smaller.
As for my actual code, I found I learned the most from CSS, which I never really understood before. Having the two documents (HTML and CSS) side by side, while also having the rendered version in the browser, was amazing, and so much fun!
Here is some of the CSS code I used for my paragraphs:
p{
border-width: 10px;
border-style:dotted;
border-color:blue;
padding: 5px;
font-size: 22;
background-color: #f9f9f9;
}
Overall, I feel like I learned a lot from the tutorials, although I’m still left with questions and a lot of room to improve.
