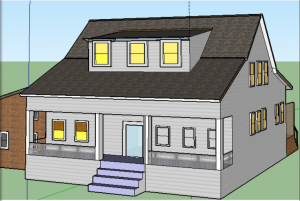
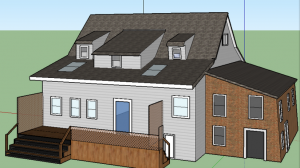
Welcome to my childhood home!
This is my home, viewed from the front.
This is my home, viewed from the back.
Creating this 3D model took several tries over several hours. I encountered some technological roadblocks (namely, SketchUp crashed a few times on the computer I was using) as well as some more mundane roadblocks (such as not being able to picture my own house). In general, I found SketchUp to be rather user-friendly and dangerously addictive. The pull to add greater detail and precision was strong, and I was forced to resist it in order to get on with life.
As such, I had to make several compromises. For one thing, the first floor of the house is far too large, with the back door seemingly built for giants, and the upper windows built for dwarves. The whole house appears too large, and the windows are maddeningly uneven and unparallel. Additionally, I had to leave out an important aspect of my home: its yellow siding. Although there was siding, there was not an option for yellow siding, so I was forced to leave my house a ubiquitous gray.
However, I did discover a few tricks along the way. For example, after struggling to create railings on the back porch by fashioning the railing out of two squares elongated with the “push-out” tool, I discovered it was much easier to carve the shape of the railing out of a larger 2D square, and then pull the entire shape into the third dimension. If looked at closely, you can tell that one method is far smoother than the other by examining the left railing of the back porch (created with multiple parts) to the right railing of the back porch (created by carving).


This is an impressively detailed model! We’ll learn some more advanced techniques to model with greater precision, but a few quick tips:
1. Use inference locking to keep shapes parallel.
2. Once you add a texture, click the house icon to go to in-model textures and then double click to edit — you can pick any color and change the size easily.
Finally, your picture captions work, but it’s easier to add the caption text into the image properties and let WordPress keep the caption aligned with the picture.