Digital Humanities as Community, or Making Relationships
Debates over the definition of the Digital Humanities are by this point very clichéd, to the point that many people have begun arguing that we stop worrying about it altogether. There is a building consensus that DH, however you define it, is above all a community, or if you like a social network; specifically, a community of practice that is open, public, collaborative, and above all welcoming.
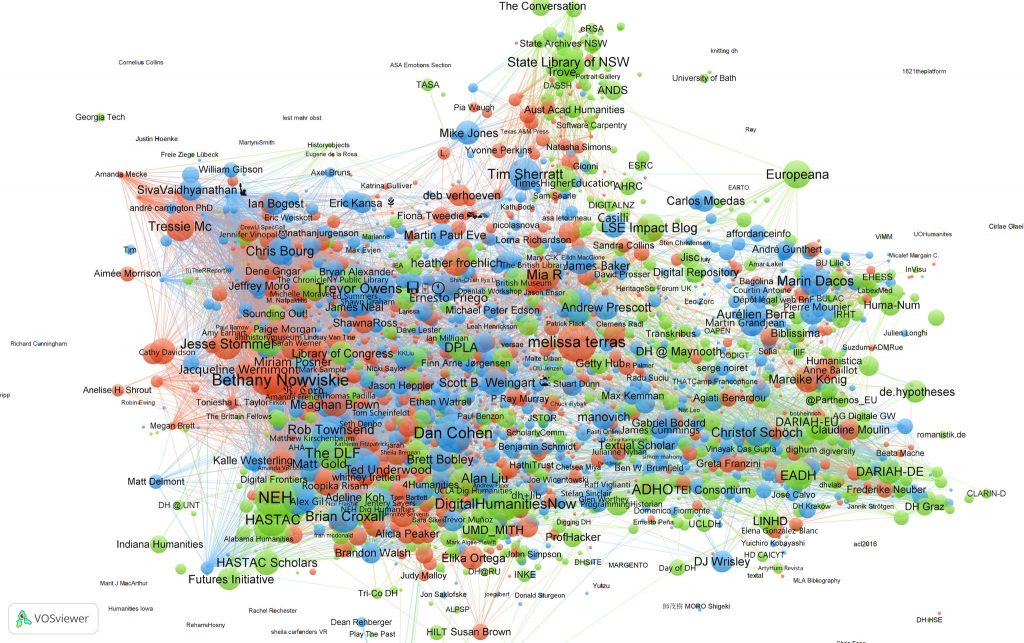
The main thing you have to do to get involved, is to just get involved. Express your interest by joining the community. One of the main ways people do that is by posting, blogging and tweeting their ideas, projects, and questions publicly on various platforms. Twitter is probably the primary vehicle for this (as illustrated by the diagram below which visualizes the DH community through a network of “co-retweets;” that is, people who like to share the same stuff).
Blogging 101
But blogs are the original twitter, and still a valuable means of long-form expression, engagement and project sharing. In the DH world, the HASTAC community is a good example of a very large and long-standing network whose main connective activity continues to be its collaborative blog.
To begin to join this world, you will all be reading, writing, and sharing what we do this term on this blog and your own, which we’ll set up next week. This is not just about trying out the digital humanities. It is also about practicing skills that will serve you well beyond your college career no matter what you choose to do. Having control over your internet presence is crucial in this day and age, and building your own website is one of the best ways to craft and maintain a public, online identity.
In Class Exercises
Your first post will be on your process and experience with SketchUp, so we need to log back in and export the results of your work.
SketchUp Export
- Go to app.sketchup.com and log in to your account
- On the home screen, open the saved file so that you can find some views to export
- Use the Orbit tool or the Views presets in the right side toolbar to find some good angles of your beautiful model

- Export several views as PNG images.
Note the other free option is to download as STL, which is the format used for 3D printing — we’ll come back to this later - Finally, create a new folder in our shared Google Drive and save your images there
Google Drive Shared Folder
Posting to the Blog
For starters, you’ll register for this class site so you can comment on assignments, post to the blog and get familiar with the WordPress interface, if you aren’t already.
Follow these instructions to register for our course site and post your first comment.
Once you’ve done all that…
- Log in to the Hacking the Humanities class blog and make a new post sharing several 2D images of your house that you exported from SketchUp and telling us about your process.
- How easy/hard was it?,
- what elements particularly bogged you down?,
- what compromises did you have to make?
- What humanistic uses can you envision for this tool in the areas of research or teaching?
- Make sure to also share a tip for other novice SketchUp users about the tool that you found most useful, or a technique that you wish you had figured out sooner. Part of the digital maker philosophy is sharing the knowledge you gained, so make sure to pass it on.
Congratulations! You have posted your first blog post and can now share your interests and knowledge with the world.
Now, read and comment on two of your classmates SketchUp posts
We barely scratched the surface of what you can do with this platform in class, but we will get deeper into the weeds next week as you set up your own WordPress instance with complete administrative control.
Your Digital Identity
One of the goals of this course is to help you develop not just digital literacy but digital fluency.
A person literate in a given language is able to read and understand, whereas a person fluent in that language will be able to think flexibly and combine words and concepts creatively in order to communicate. There has been a movement towards teaching digital fluency at many educational institutions lately, one part of which involves understanding how to create and curate what the internet knows about you.
Today — BEFORE we register for a domain or start putting too much content up in public — we are going to talk about your online presence and what to know in order to feel confident about your data and image on the internet.
As discussed last time, a central tenet of the digital humanities community is sharing, which is one of the three principles of digital identity Brian Croxall outlines in his crash course on digital identities video.
- Consistency
- Share Your Work
- Pay Attention to Others
In that spirit, we are going to “borrow” great ideas and materials today from Brian, the contributors to a recent panel on “Going Public” at the MLA, and others.
In-Class Exercises
Google Yourself
- Google yourself on your own device.
- Ask your partner to Google you on theirs.
- Compare results.
- Switch and do the same for your partner.
- Discuss!
h/t Jacinta Yanders, Going Public: How and Why to Develop a Digital Scholarly Identity
Take Control of Your Identity
- Make a copy of the Taking Control of Your Data worksheet and save it in your personal folder.
- Fill out Part 1 with your self-reported data
- Discussion: do your search results match the version of you you’d like to be publicly available?
- Fill out Part 2 with your administrative data
- Discussion: what does your phone (and the company’s that have access to it) know about you?
- Fill out Part 1 with your self-reported data
h/t Tressie McMillan Cottom, PhD
Assignment
Now that you’ve read more about Digital Humanities and tried your hand at making something, I want to hear your reflections on how you see your past experiences and current interests intersecting with this field.
Choose a quotation that resonated with you from one of the readings assigned for today and write a 250-300 word blog post that answers the following questions:
- Why did this particular passage grab your attention?
- What elements of your past experiences, current interests, or future plans did it kindle?
- Under the large umbrella of Digital (Arts &) Humanities, which areas of inquiry, methods or techniques are you most eager to pursue this term and why?
Start your blog post with a Quote block and citation as in the example below
Digital Humanities is born of the encounter between traditional humanities and computational methods.
Burdick et al. “One: From Humanities to Digital Humanities,” in Digital_Humanities (Cambridge, MA: MIT Press, 2012), 3.
As you write, remember that blog writing is a different beast that lies somewhere between formal academic writing and casual social media or email style. Try for a tone that is scholarly and informed but neither too stiff nor too sloppy. It can be a tough balance to strike, but think of your intended audience and try to find a voice that works for you.
Resources
Carleton College’s own web services group has a lot of good resources for how to write for the web effectively.
9 replies on “WordPress 101”
SketchUp was surprisingly easy and intuitive to use! I didn’t experience much frustration from learning to use it. Simple yet powerful 3D-modeling tools like SketchUp can help history students reconstruct historical buildings from photographs, which may bring them deeper insights into relevant historical events.
A time-saving tip that I would like to share: use keyboard shortcuts to change tools instead of using the mouse.
That’s a really good idea! What keyboard shortcuts did you use?
It took me a while to get used to many of the features in SketchUp. One of my biggest issues was trying to figure out how to move one specific line without moving a large part of the building that it was connected to. Overall, however, using SketchUp was a good experience and it seems like it’s a pretty user-friendly program. This assignment was helpful for us to analyze our struggles and successes while learning a new program.
I also had trouble with this. I eventually started making new rectangles and moving those on top of what I had previously done.
Making a roof based on the instructions from the Youtube video playlist proved to be quite cumbersome. There were many instances when extenuating the line upwards would morph the entire structure and not make a simple roof, especially for areas that weren’t simply rectangular or square.
I ran into this problem as well. Hopefully as we learn more about and interact more with SketchUp, moving and extenuating lines will become less burdensome.
I thought SketchUp was a good way for people with very little experience to test and experiment with 3D modeling. I found that it was relatively simple to use, with the exception of a few tools. In particular, I had trouble with creating the roof. I tried to add an overhang (similar to the tutorial), but that made the tip of the roof not connect at an even point. I believe this could be fixed if I had made the roof a different angle. I also had trouble creating slants and ramps; the midpoints I made kept moving along the wrong axis.
I agree. I also had a hard time getting lines to connect to the point I wanted it to. I had a lot of trouble making surfaces appear as surfaces.
Pretty cool program. Despite some frustrations, I still found Sketchup to be entertaining and Accessible.
3/5